为什么要静态编译(static link)
在默认情况下,用QtCreator编译程序时,使用的是动态编译。编译好的程序在运行时需要另外加上相应的Qt库文件,一大堆dll文件。如果想将生成的程序连同所需要的库一起完整地打包成一个可执行程序,那就需要使用静态编译。Qt官方不提供静态编译好的安装包,所以需要我们在自己的电脑上静态编译。而且exe文件会比动态编译的要小上很多。
1.源码下载/source code download
2020-2-25: Qt 5.14.1 版本出来
Qt最新版5.14.1的源码下载地址:Index of /archive/qt/5.14/5.14.1/single
选择文件:qt-everywhere-src-5.14.1.zip
源码压缩包849M,解压后2.32G
2. 编译工具下载/compiler download
Qt官方文档要求编译工具:Qt for Windows - Requirements Qt 5.14
打开源码目录下的README文件,查看当前版本Qt要求的Windows环境下编译需要安装的工具:
   Windows:
   --------

     Open a command prompt.
     Ensure that the following tools can be found in the path:
     * Supported compiler (Visual Studio 2012 or later,
        MinGW-builds gcc 4.9 or later)
     * Perl version 5.12 or later   [http://www.activestate.com/activeperl/]
     * Python version 2.7 or later  [http://www.activestate.com/activepython/]
     * Ruby version 1.9.3 or later  [http://rubyinstaller.org/]
编译环境选择:MinGW/MSVC
在Windows上,有两个预构建环境可供选择:一个是 MinGW ,另一个是Microsoft Visual Studio(MSVC)。这两个环境不兼容,无法混合。你必须选择一个。
这两者的区别如下:
当你的项目使用MinGW编译的使用,想要用一个MSVC编译生成的库时就会有问题。使用MinGW编译项目的时候,所使用的Lib也要是MinGW编译的。如果你只是开发Window平台的软件时,最好用Qt MSVC组合,这样可以使用大量的第三方lib,还有很多的构建指令,毕竟window上MSVC才是王道。
我选择MSVC,打开安装VS时自带安装的MSCV:x64 Native Tools Command Prompt for VS 2019
**********************************************************************
** Visual Studio 2019 Developer Command Prompt v16.4.5
** Copyright (c) 2019 Microsoft Corporation
**********************************************************************
[vcvarsall.bat] Environment initialized for: 'x64'

C:\Program Files (x86)\Microsoft Visual Studio\2019\Community>
默认编译的结果是64位的Qt
如果你想编译32位版本的qt,可以选择x86 Native Tools Command Prompt for VS 2019
警告:不要使用 Developer Command Prompt for VS 2019
如果你想在linux系统中进行Qt的编译工作,参考这个问答:c++ - How to compile Qt 5 under Windows or Linux, 32 or 64 bit, static or dynamic on Visual Studio or g++ - Stack Overflow
Perl
Perl 官网:Perl Download - www.perl.org
其中Windows版有2种可以下载,分别是ActivePerl和Strawberry Perl。其中ActivePerl需要注册后下载,Strawberry Perl可以直接下载,推荐Strawberry Perl.
Strawberry Perl下载地址:Strawberry Perl for Windows
安装时默认会添加ActivePerl到环境变量。
测试添加是否成功:
Windows PowerShell
版权所有 (C) Microsoft Corporation。保留所有权利。

尝试新的跨平台 PowerShell https://aka.ms/pscore6

PS C:/Users/peter> perl.exe -v

This is perl 5, version 30, subversion 1 (v5.30.1) built for MSWin32-x64-multi-thread

Copyright 1987-2019, Larry Wall

Perl may be copied only under the terms of either the Artistic License or the
GNU General Public License, which may be found in the Perl 5 source kit.

Complete documentation for Perl, including FAQ lists, should be found on
this system using "man perl" or "perldoc perl".  If you have access to the
Internet, point your browser at http://www.perl.org/, the Perl Home Page.
Python
下载Python:Python Releases for Windows Python.org
推荐下载最新版3.8.1
安装后手动添加Python到环境变量。
测试添加是否成功:
Windows PowerShell
版权所有 (C) Microsoft Corporation。保留所有权利。

尝试新的跨平台 PowerShell https://aka.ms/pscore6

PS C:/Users/peter> python.exe
Python 3.7.4 (default, Aug  9 2019, 18:34:13) [MSC v.1915 64 bit (AMD64)] :: Anaconda, Inc. on win32

Warning:
This Python interpreter is in a conda environment, but the environment has
not been activated.  Libraries may fail to load.  To activate this environment
please see https://conda.io/activation

Type "help", "copyright", "credits" or "license" for more information.
>>>
Ruby
Ruby下载地址:RubyInstaller for Windows
安装时默认会添加Ruby到环境变量。
测试添加是否成功:
PS C:/Users/peter> ruby.exe -v
ruby 2.6.5p114 (2019-10-01 revision 67812) [x64-mingw32]
版权声明:本文为博主原创文章,转载请附上博文链接:Qt最新版5.14在Windows环境静态编译安装和部署的完整过程 VS 2019-Qt static link build Windows
3.编译
在D盘新建一个目录用来存放编译好的内容:D:\qt
在x64 Native Tools Command Prompt for VS 2019的终端进入Qt源代码目录:
C:\Users\peter\Downloads>cd qt-everywhere-src-5.14.1
C:\Users\peter\Downloads\qt-everywhere-src-5.14.1>
1.修改源码里的qtbase\mkspecs\common\msvc-desktop.conf文件
修改-MD为-MT
修改前:
QMAKE_CFLAGS_RELEASE    = $$QMAKE_CFLAGS_OPTIMIZE -MD
QMAKE_CFLAGS_RELEASE_WITH_DEBUGINFO += $$QMAKE_CFLAGS_OPTIMIZE -Zi -MD
QMAKE_CFLAGS_DEBUG      = -Zi -MDd
修改后:
QMAKE_CFLAGS_RELEASE    = $$QMAKE_CFLAGS_OPTIMIZE -MT
QMAKE_CFLAGS_RELEASE_WITH_DEBUGINFO += $$QMAKE_CFLAGS_OPTIMIZE -Zi -MT
QMAKE_CFLAGS_DEBUG      = -Zi -MTd
D的意思是动态编译(dynamic link),T的意思是静态编译(static link)。 这一步官方教程没有要求,但其他人的很多教程里都有写,我就加上了
2.配置config文件:
配置命令如下:
configure.bat -static -prefix "D:\qt" -confirm-license -opensource -debug-and-release -platform win32-msvc -nomake examples -nomake tests -plugin-sql-sqlite -plugin-sql-odbc -qt-zlib -qt-libpng -qt-libjpeg -opengl desktop -mp
具体含义如下:
configure.bat
-static #指明是静态编译
-prefix "D:\qt" #指明安装的目录
-confirm-license -opensource  #指明是开源版本的qt
-debug-and-release #指明需要debug版和release版,可以单独选择release版
-platform win32-msvc  #指明使用msvc编译,这里的win32并不指32位
-nomake examples -nomake tests  #不编译样例
-plugin-sql-sqlite -plugin-sql-odbc -qt-zlib -qt-libpng -qt-libjpeg #可选插件
-opengl desktop  #用系统自带的opengl
-mp #多核编译
C:\Users\peter\Downloads\qt-everywhere-src-5.14.1>configure.bat -static -prefix "D:\qt" -confirm-license -opensource  -debug-and-release -platform win32-msvc  -nomake examples -nomake tests  -plugin-sql-sqlite -plugin-sql-odbc -qt-zlib -qt-libpng -qt-libjpeg -opengl desktop -mp
+ cd qtbase
+ C:\Users\peter\Downloads\qt-everywhere-src-5.14.1\qtbase\configure.bat -top-level -static -prefix "D:\qt" -confirm-license -opensource  -debug-and-release -platform win32-msvc  -nomake examples -nomake tests  -plugin-sql-sqlite -plugin-sql-odbc -qt-zlib -qt-libpng -qt-libjpeg -opengl desktop -mp

Notice: re-mapping requested qmake spec to unified 'win32-msvc'.

Bootstrapping qmake ...
....
Qt is now configured for building. Just run 'nmake'.
Once everything is built, you must run 'nmake install'.
Qt will be installed into 'D:\qt'.

Prior to reconfiguration, make sure you remove any leftovers from
the previous build.
3.make
上面提到过在Windows上,有两个预构建环境可供选择:一个是MinGW,另一个是Microsoft Visual Studio(MSVC)。
我选择的是msvc环境,使用命令nmake即可进行编译。
nmake
新版的MSVC可以进行多线程编译,旧版本的MSVC自带的nmake没有多线程编译功能,有一个替代功能的软件jom可以进行nmake的多线程编译。
jom的下载地址:Jom - Qt Wiki
在刚才的终端中运行命令:
D:/jom_1_1_3/jom.exe
我的CPU是i7-8565U,CPU100%运行,花费了大约3个小时。
make完成后源码和编译后的共有26G
4.make install
使用nmake单线程install:
nmake install
安装完成后,QT的文件夹有4G
4.添加到Qt Creator
这里需要说明一下,Qt Creator现在已经不能直接下载最新版本,需要在线安装:Index of /archive/online_installers/3.2
下载后安装最新版的Qt Creator4.9
添加Qt Versions
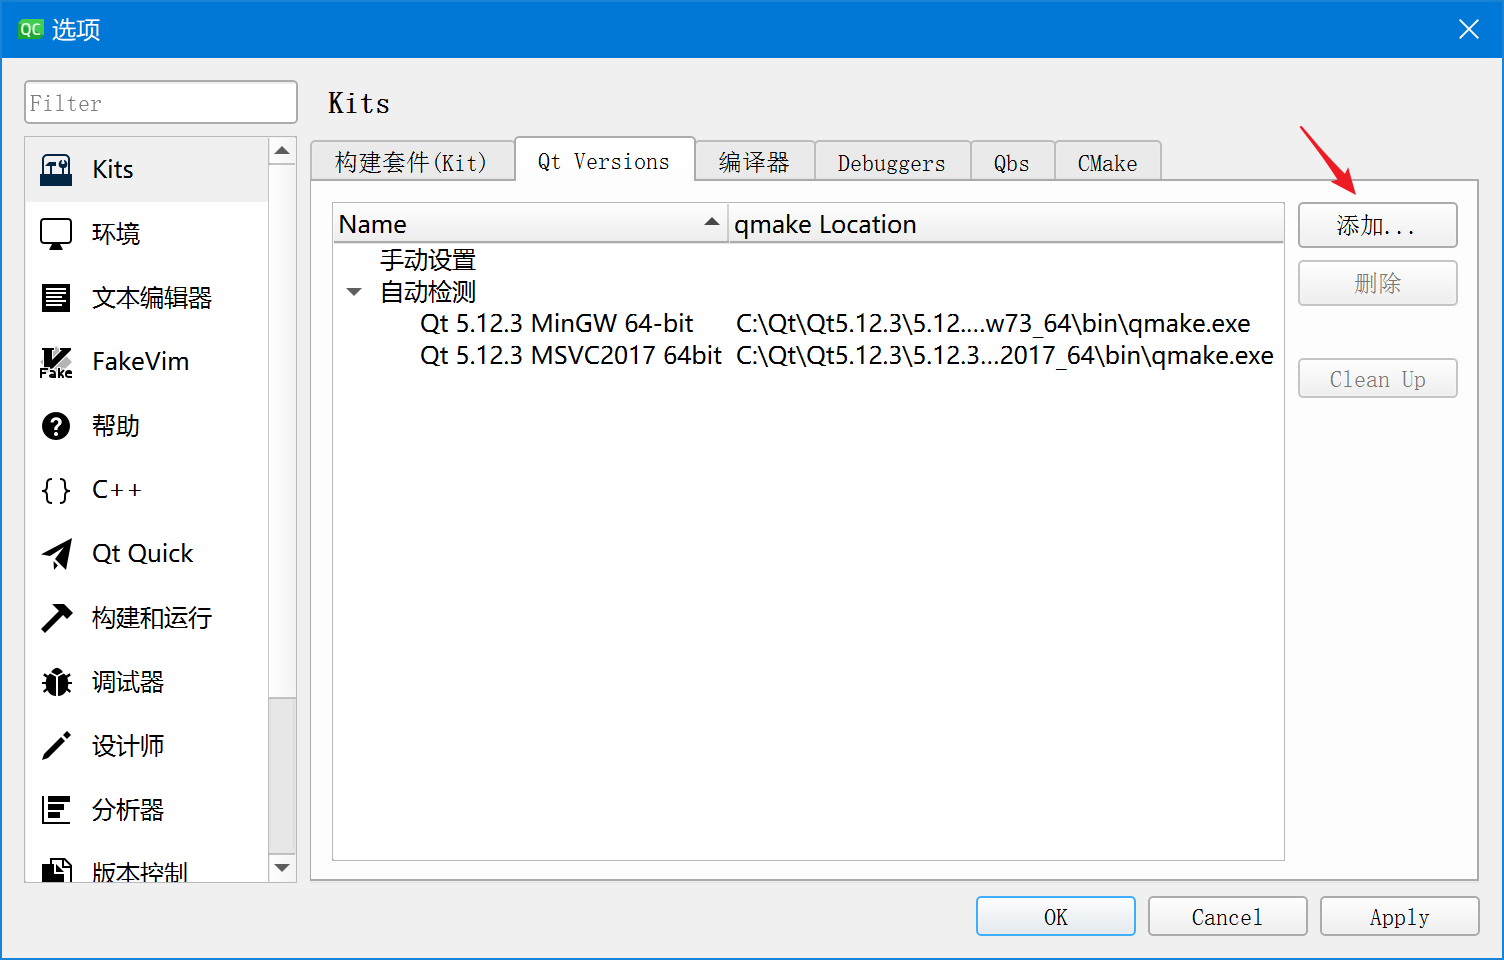
新建构建套件
新建构建套件,Qt版本选择刚添加的静态版,记得编译器选自己编译时用的编译器。
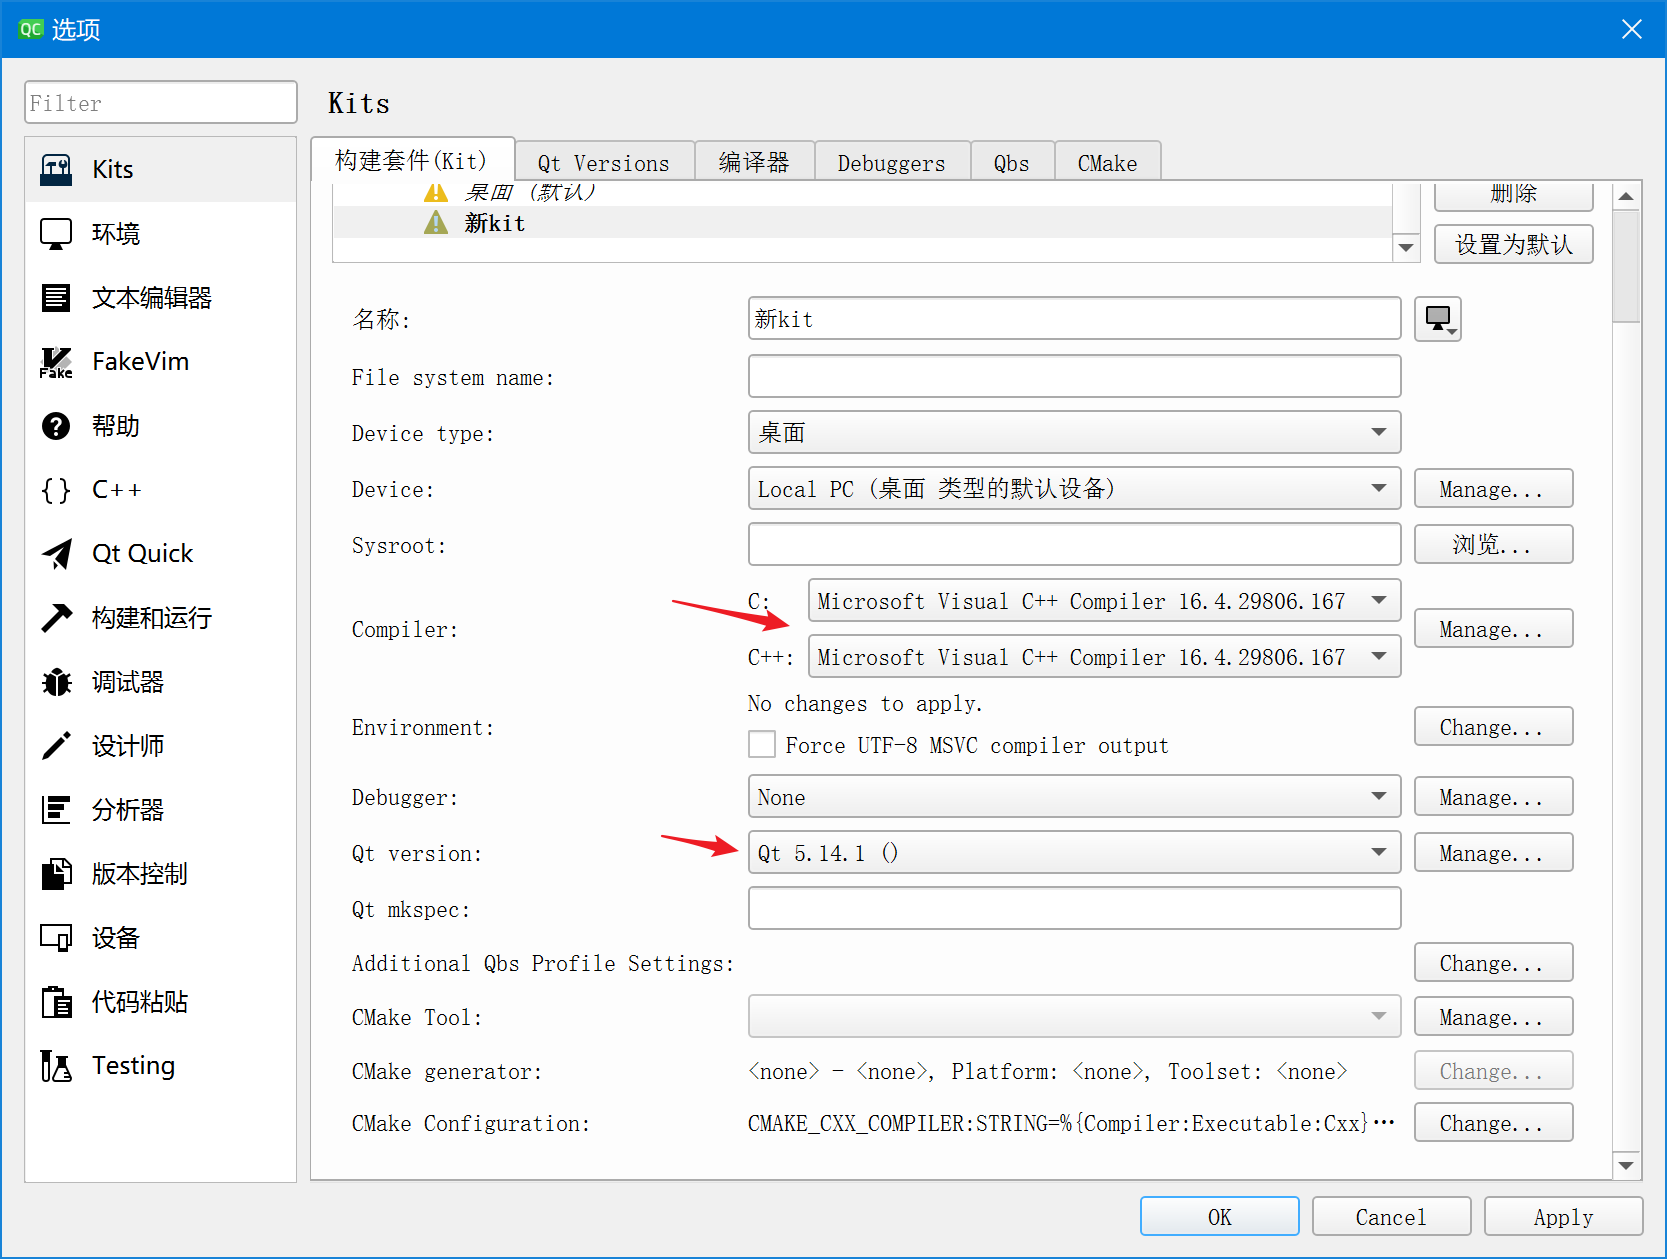
如果编译器版本选错了,会报错:
qwindowsvistastyled.lib(main.obj):-1: error: LNK1112: 模块计算机类型“x86”与目标计算机类型“x64”冲突
:-1: error: Symbolic links not supported: disabling -L.
注意:如果选择的编译器跟跟编译qmake时的编译器不同,会报很多错误
如果你不知道自己的编译器是哪个版本,全部试一遍
新建项目
新建项目,成功运行:
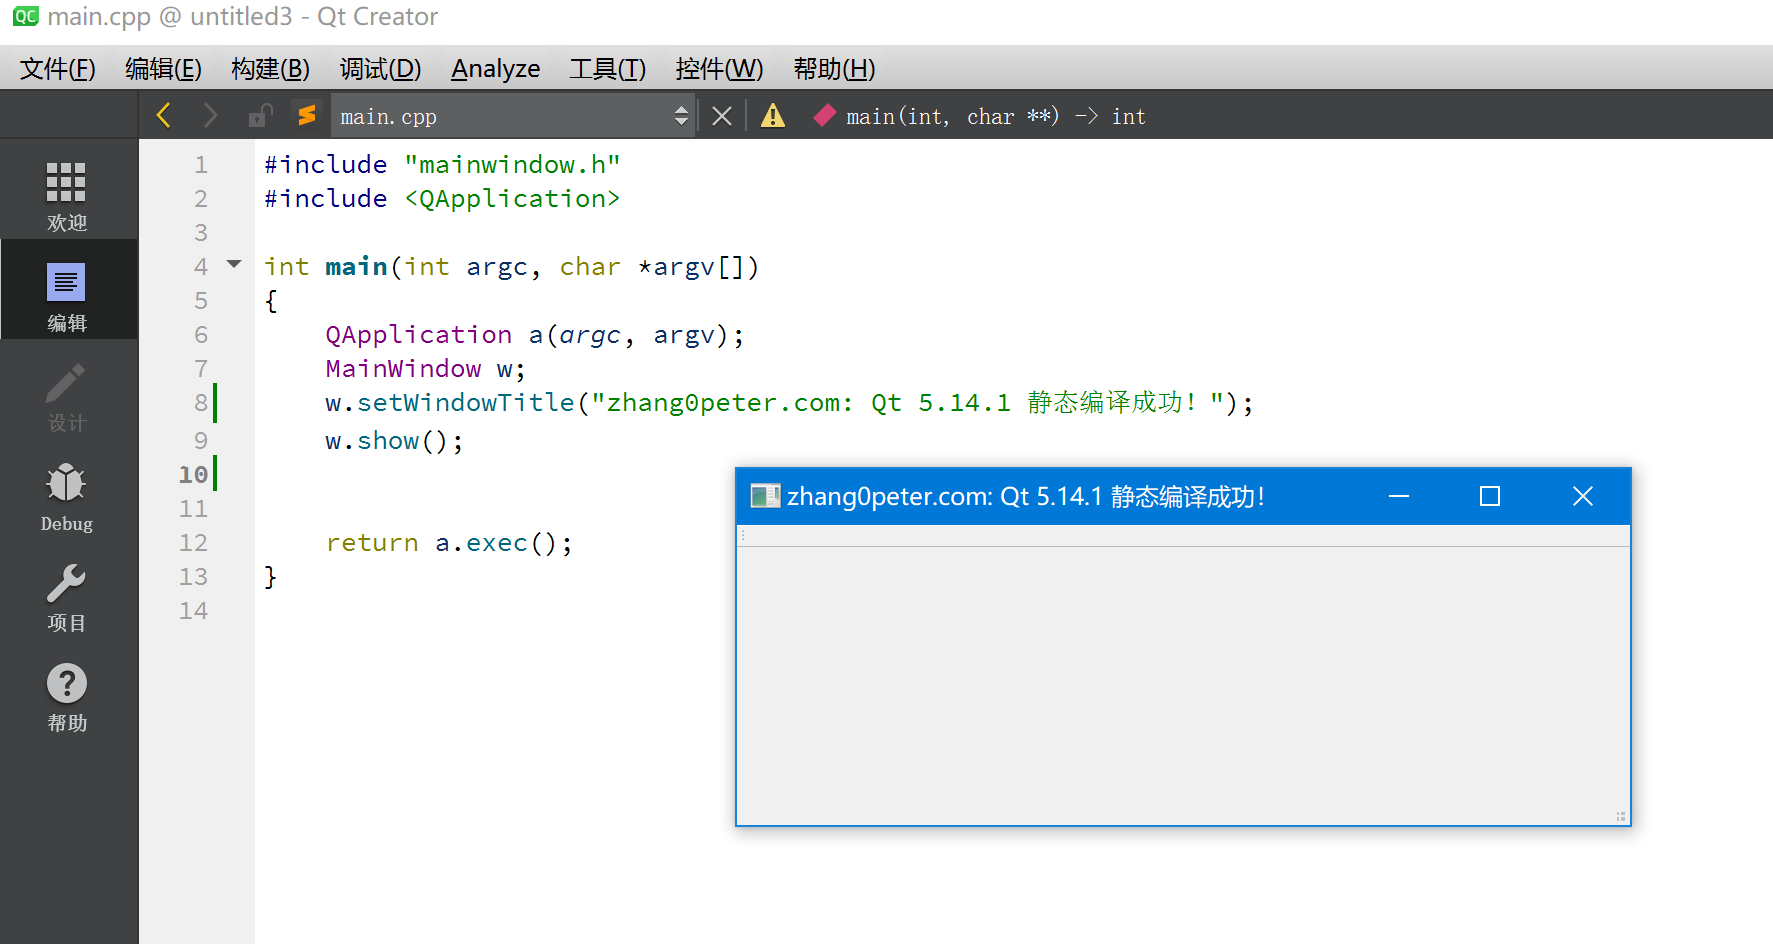
一个exe的大小是13M,包括了所有需要的内容。
5.小结
Qt 5.14.1 的静态编译的过程还算顺利,需要注意的是编译前要仔细阅读官方文档,毕竟很多教程不是最新的,但官方文档一般都是最新的。
我把编译好的qt放到了百度网盘上,有需要的可以下载,不保证能用:
链接: https://pan.baidu.com/s/1qCWI5uYhWvwHVptFSSTEbw 提取码: 2333
文档信息
- 本文作者:last2win
- 本文链接:https://last2win.com/qt-5.14-static-link/
- 版权声明:自由转载-非商用-非衍生-保持署名(创意共享3.0许可证)